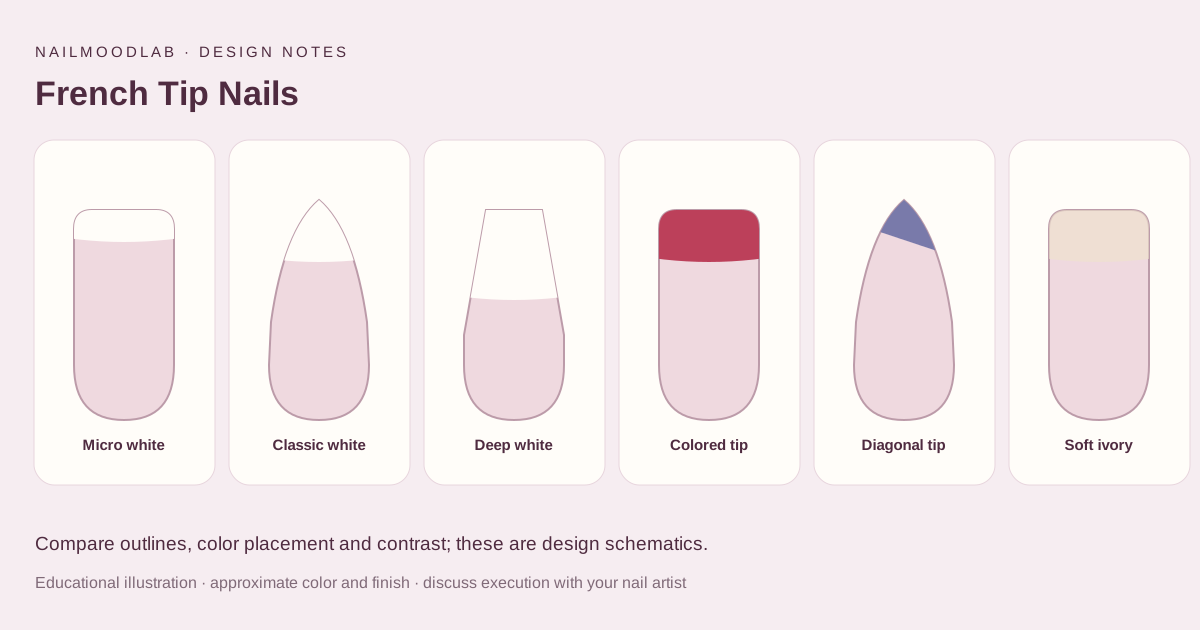
French tip nail designs separate the edge from the base. You can change the tip width, its curve, the color contrast or the nail outline while keeping that basic arrangement. Choose one of those changes as the main feature before adding more decoration.
The original page suggested a very slim crescent or diagonal edge, with combinations such as plum on blush, cobalt on a clear-looking base and a reflective tip on nude. This expanded guide keeps those ideas and helps you describe the proportions clearly.
Start with three choices
| Choice | What to compare | What to show the artist |
|---|---|---|
| Tip width | Fine border, clear band or deep colored area | A reference at your intended length |
| Line shape | Curved smile line, diagonal or another defined border | Where the edge starts and ends |
| Base coverage | Translucent or more covered background | How much natural nail remains visible |
| Color contrast | White, colored or lower-contrast tip | The tip and base together |
| Nail outline | Square-like, rounded or tapered | A view showing both sides and the end |
The width of the colored area and the depth of the curve are related but different. A fine border can follow a pronounced curve; a broader tip can have a gentler curve. Point to the detail rather than asking only for “thin French.”
Six French directions to compare
1. Micro white tips
Keep the white border narrow and let the base occupy most of the visible nail. This is a useful proposal when you want the classic color contrast without a large white block. At a short length, ask the artist what width can be achieved while keeping the edge clearly visible.
2. A classic curved white tip
Choose an identifiable smile line and show the amount of white you like. Specify the base separately: sheer pink and a more covered pink are different backgrounds. Keep the same width reference across the set, allowing the artist to adapt it to each nail.
3. A deeper tip
Make the colored edge a larger part of the design. Show the curve from the center to both sides; a frontal crop that hides the sides may leave the request ambiguous. On a shorter manicure, discuss reducing the colored area instead of copying the long reference unchanged.
4. Colored French tips
Plum on blush, cobalt on a clear-looking base or another two-color combination can make the border the focus. Compare the pair together and decide which color should dominate. For a specific red direction, see red French tip nails, which covers cherry, burgundy and accent layouts.
5. A diagonal edge
A slanted border changes the line direction while preserving a simple base-and-tip structure. Mark the direction on each hand; mirroring the diagonal and repeating it in the same direction create different layouts. Our diagonal French guide covers that choice in more detail.
6. A softer ivory tip
If a bright white edge feels too prominent, compare ivory or cream against the base. Decide whether you still want a visible curve or a more softened transition. The American versus French manicure guide explains that contrast choice without assuming a single salon technique.
Shape changes the outline the tip follows
On a square-like outline, inspect the center and corners of the border. On almond, inspect how the curve meets the tapered end. A pointed-looking reference and a flatter-looking reference may feel different even when the tip color is the same.
Compare one variable at a time. Keep base coverage and border width similar while you compare shapes. Otherwise you may be choosing the amount of color rather than the outline.
Ask the technician what is feasible at your intended length and with the service being booked. The diagram illustrates the appearance choices, not physical suitability or how an enhancement should be constructed.
Plan French tips for short nails
Use a reference close to the length you will wear. Decide how much base you want to remain visible, and identify the border as the main detail if space is limited.
If you also want a motif, choose one accent finger and ask whether the tip or motif needs simplifying. The French tips for short nails guide focuses on this specific smaller-canvas problem.
Do not assume your natural white edge must determine the painted border. Show the finished appearance you want, then ask the artist to explain what can be achieved with your actual nails and chosen service.
Add finish without losing the main idea
A reflective or chrome-looking tip can be a separate finish choice. Tell the artist whether the reflection belongs only on the edge or across the whole nail. A full-nail reflective layer may change the quiet base you liked in the original reference.
You could also propose a glossy-looking tip against a matte-looking background. Confirm the available products and ask how the salon treats that finish in its appointment and quote. A picture cannot establish wear or maintenance requirements.
For more variations, a French-tip inspiration collection can help identify a visual reference. Select the detail you like; do not assume a photograph identifies a material or a complete service.
Bring a complete request
- Set the length and silhouette.
- Pick base coverage.
- Mark the width and curve of the tip.
- Choose the tip color and any finish.
- Mark accent fingers and confirm the quote.
For example: “Short squoval nails, a translucent pink base and a narrow cobalt edge. Please keep the center line slim and the corners softly finished. I want the color only on the tip, with no additional motifs.”
Use NailMoodLab to refine a visual idea before saving a reference. It can help communicate proportions and placement; it cannot determine exact polish color, physical fit or the salon result.
Common mistakes
- Asking for French tips without specifying how much of the tip should be colored.
- Changing base, shape, width and finish at once when comparing references.
- Leaving “chrome” ambiguous about whether it covers the edge or the entire nail.
- Assuming a long-nail photo can be copied at a much shorter length without adaptation.
Questions readers ask
Is micro French a different service material?
It describes a fine border, not a material. Ask the salon which service and products it uses for the requested appearance.
Can the tip be colored instead of white?
That is a design direction you can request. Compare the actual color with the base and confirm availability.
Should every tip have identical dimensions?
Show the visual consistency you want, then let the artist discuss adaptation to each nail. A single numerical width from one reference does not define the whole set.