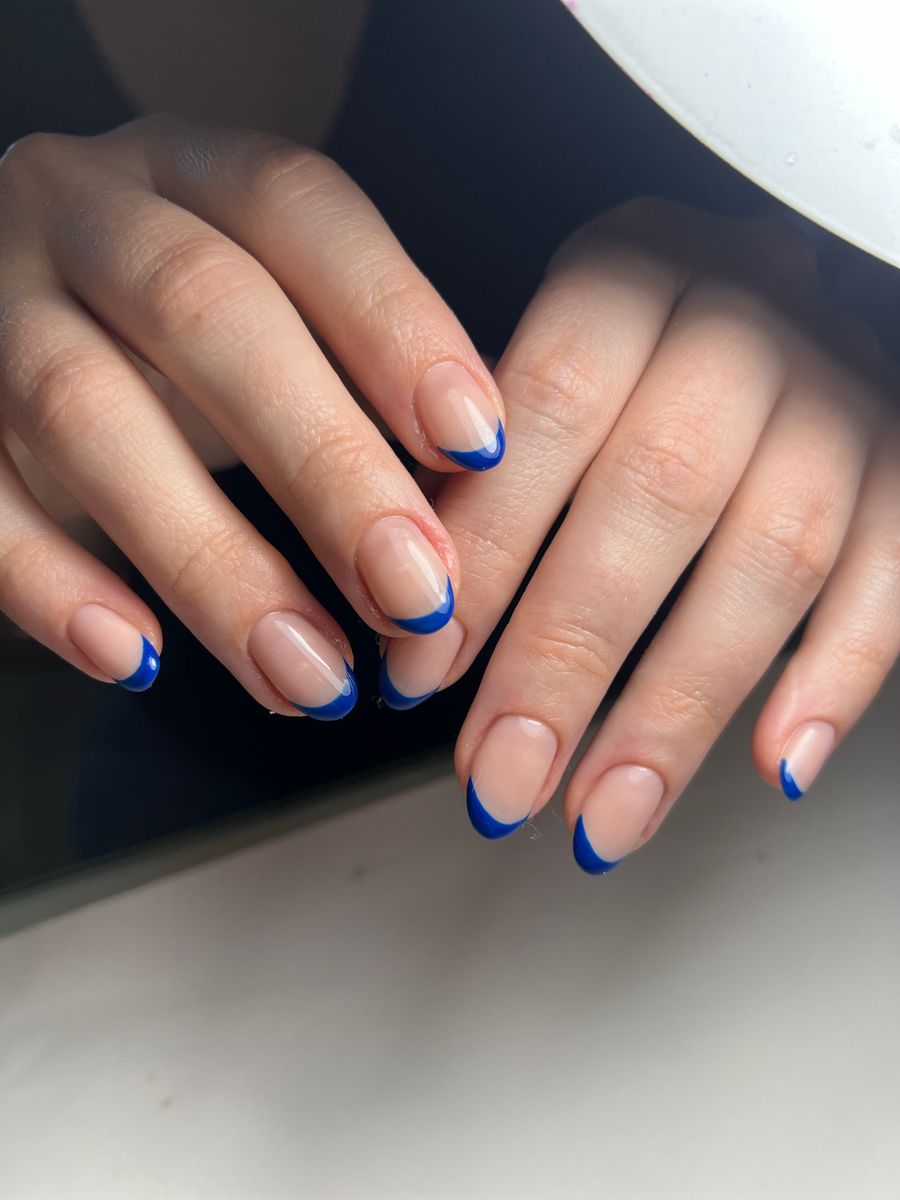
The most adaptable abstract nail art ideas use a small set of shapes: a curve, a dot, an irregular color block, or a line that follows one edge. To fit a shorter nail, reduce the number of elements and keep open space. For more length, extend the composition rather than automatically adding more decoration.
Abstract art does not need to depict a recognizable object. Its character comes from color, rhythm, and placement. A simple rule repeated across the set can make varied nails look intentional while leaving room for the nail professional to adapt the details.
Choose a visual vocabulary before choosing a full set
Start with one or two types of marks. Curves and dots create a different mood from sharp blocks and straight lines. Mixing every option at once can make the set feel less coherent.
Then choose a limited palette. You might use a neutral base, one main color, and a small contrasting accent. The exact number is a design choice, but assigning each color a role helps prevent random variation.
Finally, decide how much open area you want. Negative space means an intentionally unpainted-looking or visually quiet part of the design. In a salon reference, clarify whether you mean a sheer base, a bare-looking effect, or simply a plain background color.
The minimalist nail-art guide offers useful examples of giving a small amount of detail a clear purpose.
Six abstract directions to consider
1. One sweeping curve
Use a single curved band that enters from one edge and travels across part of the nail. It can feel soft and fluid without needing a complicated swirl network.
For short nails, keep the curve broad enough to read and leave the rest quiet. For longer nails, let it travel farther along the shape instead of adding several competing bands.
Try a cream base with a terracotta curve for a warm palette, or a sheer neutral with a dark blue curve for stronger contrast. Keep the curve's visual weight related across the set even when its position changes.
2. Offset dots and small blocks
Combine one irregular color block with a small dot placed away from it. The separation creates a simple relationship that can vary from nail to nail.
On a short canvas, use fewer elements rather than making each one extremely tiny. On a longer canvas, increase the spacing so the composition does not cluster unnecessarily at one end.
This direction works well as a limited accent because the remaining nails can repeat one of the colors. Ask for deliberately varied placement rather than perfectly identical stamps if that is the look you prefer.
3. Two-color edge shapes
Place color along one side or corner of each nail, leaving a quieter center. The result can suggest a frame without enclosing the entire nail.
For a shorter length, keep the edge treatment simple and avoid several narrow nested outlines. For a longer shape, a line or block can follow the extended edge while leaving enough open area for contrast.
Choose whether the colors repeat in the same order or alternate across the hand. That small rule helps the set feel connected even when each nail differs.
4. A loose ribbon or swirl accent
Use one flowing line that loops or changes direction. The main challenge is density: several crossings can quickly become difficult to read on a small nail.
For short nails, request a partial loop or a single gentle bend. For longer nails, a longer ribbon can work without becoming a dense tangle.
Keep the rest of the set simpler if the accent is visually busy. A plain base or one repeated color gives the eye somewhere to rest.
5. Soft irregular color patches
Think of broad, uneven shapes with a clear palette rather than tiny scattered marks. A muted peach, cream, and brown combination can produce a very different effect from saturated blue, orange, and pink.
On short nails, two well-separated patches may be enough. On longer nails, larger patches can preserve the same visual simplicity instead of multiplying the number of colors.
Tell the professional whether you want crisp boundaries or a softer visual transition. Those are different effects, and an inspiration image may not make the intended method obvious.
6. A repeated line with one interruption
Use a simple line motif across the set, then change one nail with a dot, a gap, or a small block. This creates a focal point without introducing an entirely new pattern.
The repeated line might run near a tip, follow a side, or form a shallow arc. Keep its placement deliberate and avoid a line so fine that it disappears in the reference at normal viewing size.
This is a useful option when you want abstract art that still feels restrained. The accent comes from the interruption, not from adding many unrelated details.
Scale the composition, not just the image
| Nail canvas | Adaptation to discuss | What to avoid |
|---|---|---|
| Short | Fewer motifs, clear shapes, generous open space | Shrinking a dense long-nail reference unchanged |
| Medium | A focal motif with controlled supporting detail | Filling every available area simply because it exists |
| Long | Extended lines, larger spacing, deliberate vertical movement | Adding detail until the original idea disappears |
Length is not the only variable. The outline and visible nail width also affect the available space. Ask the professional how to adapt the composition to the actual nails rather than treating the reference as a measured template.
If your favorite part is the palette, preserve it while simplifying the shapes. If it is a particular curve, keep that curve and reduce supporting decoration. This makes the adaptation feel connected to the original idea.
Plan how the nails relate across both hands
Choose one organizing rule: identical motifs, mirrored placements, alternating colors, or a shared palette with varied shapes. Without a rule, “abstract” can become a collection of unrelated ideas.
Decide whether the thumb needs its own treatment. A reference image may not show it clearly, and the larger visible canvas may invite a different arrangement. Discuss it rather than leaving it to an assumption.
You can also use a focal-point approach: a few art nails supported by plain colors. This can make the pattern easier to read and provide a simpler fallback if the appointment does not allow a more detailed set.
Specify whether both hands should match exactly or feel like related compositions. Either can be intentional; the important part is agreeing on it.
Preview a clear concept before the appointment
NailMoodLab offers prompt-based generation, hand-photo shape suggestions, and two-image virtual try-on. Generated concepts can be regenerated, downloaded, shared, or copied by URL.
Try a focused prompt:
Short oval nail concept with a sheer warm neutral base, one terracotta curve and one small dark-brown dot on each accent nail. Keep most of the surface open. Use plain terracotta on the remaining nails. Glossy finish, flat art, no raised pieces.
Inspect whether the output follows the intended density and placement. AI may add extra lines, change the shape, or make motifs too small to interpret. Revise the specific failed feature rather than adding more descriptive adjectives.
For a hand-photo comparison, use virtual try-on. Check the original and preview for changed finger proportions or nail boundaries. The result is a visualization, not proof of physical fit or salon feasibility.
Turn the reference into an achievable brief
Tell the nail professional which elements matter most: palette, line weight, open space, or the distribution of accents. Ask which details need adjustment for your chosen length and service.
The salon reference-photo guide can help you explain a flexible concept. You might say, “The warm palette and large curves matter more than copying each curve exactly.”
Confirm time and price for the agreed design. A simple-looking image can still involve careful placement, and a generated reference does not establish the work required.
Before choosing, check:
- The set uses a clear shape vocabulary and palette.
- Motifs remain readable at normal viewing size.
- Open space is intentional rather than accidental.
- The composition is adapted to your chosen length.
- Both hands and the thumb treatment are discussed.
- Essential details and acceptable changes are clear.
Explore one direction in NailMoodLab, then bring the clearest version to your nail professional. If you plan designs regularly, review your current account allowance and available plan details. Consider a future purchase only when checkout is available and the offer fits your actual use.